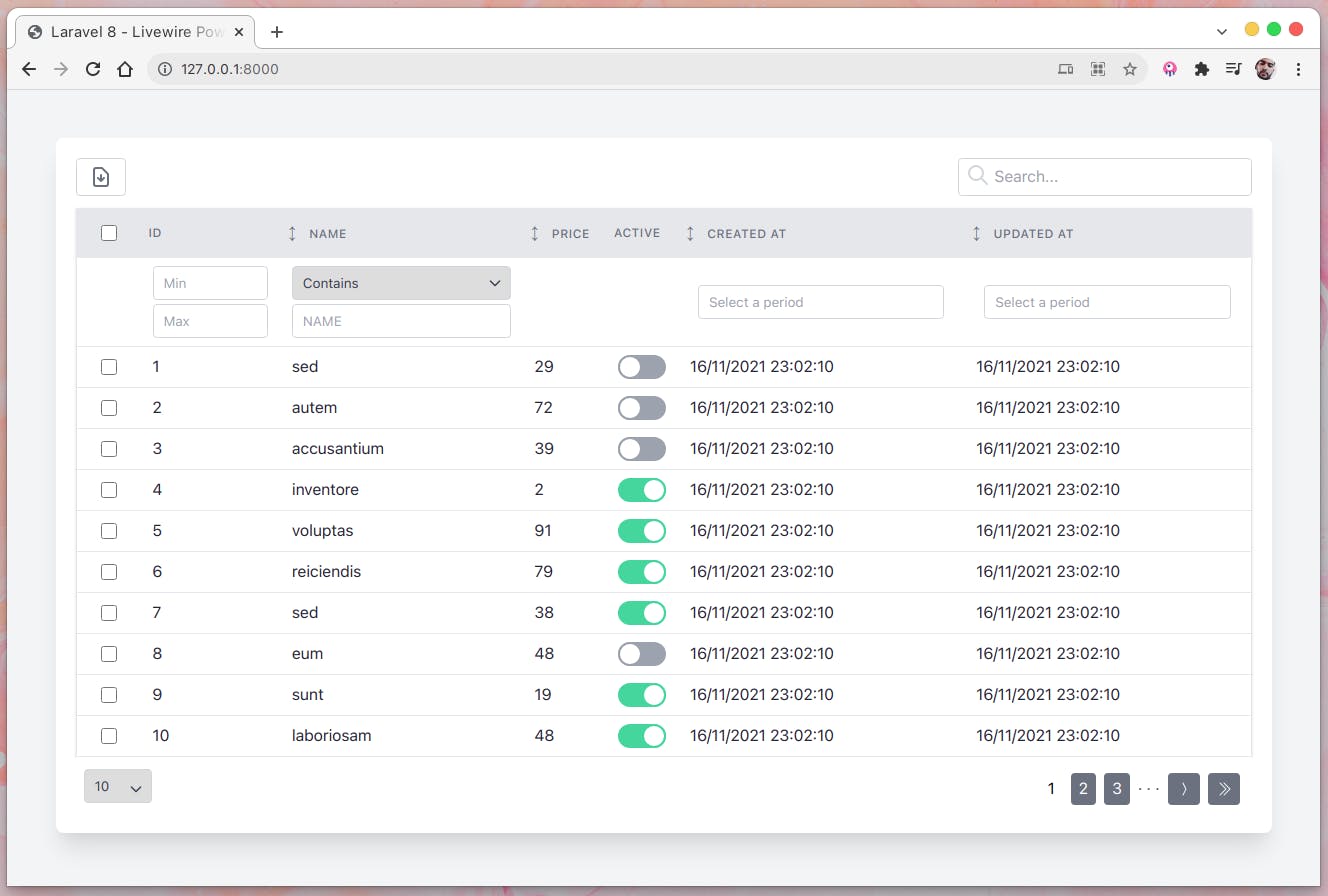
This guide walks you through the process of building a Laravel 8 application that uses Livewire and PowerGrid DataTable.
What You Will build
You will build a Laravel application with quick datatable fully configurable.
What You Need
- A favorite text editor or IDE
- PHP >= 7.3
- Composer
- Node.js
- Npm
Setup A New Project
Create a new Laravel project by using Composer:
composer create-project laravel/laravel laravel-8-livewire-powergrid-datatable
cd laravel-8-livewire-powergrid-datatable
php artisan serve
Installing Livewire
composer require livewire/livewire
Installing PowerGrid
composer require power-components/livewire-powergrid
Installing Tailwind
PowerGrid use Tailwind or Bootstrap to style the datatable, in this tutorial we use tailwind.
npm install -D tailwindcss@latest postcss@latest autoprefixer@latest
Generate the tailwind.config.js file:
npx tailwindcss init
This will create a tailwind.config.js file at the root of your project, configure the purge option:
module.exports = {
   purge: [],
   purge: [
     './resources/**/*.blade.php',
     './resources/**/*.js',
     './resources/**/*.vue',
   ],
    darkMode: false, // or 'media' or 'class'
    theme: {
      extend: {},
    },
    variants: {
      extend: {},
    },
    plugins: [],
  }
In your webpack.mix.js, add tailwindcss as a PostCSS plugin:
  mix.js("resources/js/app.js", "public/js")
    .postCss("resources/css/app.css", "public/css", [
     require("tailwindcss"),
    ]);
Open the ./resources/css/app.css and the @tailwind directive to include Tailwind’s base, components, and utilities styles, replacing the original file contents:
@tailwind base;
@tailwind components;
@tailwind utilities;
Finalizing The Installation
npm install
npm run dev
Configure Database
go to you .env file & update the database variables
DB_CONNECTION=mysql
DB_HOST=127.0.0.1
DB_PORT=3306
DB_DATABASE= #you_database_name
DB_USERNAME= #your_username
DB_PASSWORD= #your_password
Setup The Product Model
Create a new model using the Artisan CLI's command, -mf flag to create a migration and a factory for the product model
php artisan make:model Product -mf
Update The Migration Class
Go to the file database/migrations/xxxx_xx_xx_xxxxxx_create_products_table.php and update the table columns
/**
 * Run the migrations.
 *
 * @return void
 */
public function up()
{
    Schema::create('products', function (Blueprint $table) {
        $table->id();
        $table->string('name');
        $table->double('price', 8, 2);
        $table->boolean('active');
        $table->timestamps();
    });
}
Update The Models
Go to the file app/Models/Product.php and update the product model class
<?php

namespace App\Models;

use Illuminate\Database\Eloquent\Factories\HasFactory;
use Illuminate\Database\Eloquent\Model;

class Product extends Model
{
    use HasFactory;
    protected $fillable = ['name', 'price', 'active'];
}
Update The Product Factory Class
Go to the file database/factories/ProductFactory.php and update the factory class
<?php

namespace Database\Factories;

use Illuminate\Database\Eloquent\Factories\Factory;

class ProductFactory extends Factory
{
    /**
     * Define the model's default state.
     *
     * @return array
     */
    public function definition()
    {
        return [
            'name' => $this->faker->word(),
            'price' => $this->faker->randomNumber(2),
            'active' => $this->faker->boolean()
        ];
    }
}
Create New Records With Tinker
Before start creating the records, you should migrate the product table using Artisan CLI's command
php artisan migrate
- Run the
tinkerArtisan command - Create the product records
php artisan tinker
App\Models\Product::factory()->count(50)->create();
Create PowerGrid Product Table View
To create a PowerGrid table, run the following command:
 > php artisan powergrid:create

 What is the name of your new ⚡ PowerGrid Table (E.g., UserTable)?:
 > ProductTable

 Create Datasource with [M]odel or [C]ollection? (Default: Model):
 > M

 Enter your Model path (E.g., App\Models\User):
 > App\Models\Product

 Create columns based on Model's fillable property? (yes/no) [no]:
 > yes

⚡ ProductTable.php was successfully created at [App/Http/Livewire/].
⚡ Your PowerGrid can be now included with the tag: <livewire:product-table/>
Now open the file resources/views/welcome.blade.php and update it:
<!DOCTYPE html>
<html lang="{{ str_replace('_', '-', app()->getLocale()) }}">

<head>
    <meta charset="utf-8">
    <meta name="viewport" content="width=device-width, initial-scale=1">
    <title>Laravel 8 - Livewire PowerGrid Datatable</title>
    <meta charset="UTF-8" />
    <meta name="viewport" content="width=device-width, initial-scale=1.0" />
    <link href="{{ asset('css/app.css') }}" rel="stylesheet">
    {{-- styles --}}
    @livewireStyles
    @powerGridStyles
</head>

<body>
    <div class="min-h-screen bg-gray-100">
        <div class="py-12">
            <div class="max-w-7xl mx-auto sm:px-6 lg:px-8">
                <div class="bg-white overflow-hidden shadow-xl sm:rounded-lg p-5">

                    {{-- Product PowerGrid Tag --}}
                    <livewire:product-table />

                </div>
            </div>
        </div>
    </div>
    {{-- scripts --}}
    @livewireScripts
    @powerGridScripts
</body>

</html>
Testing your application
Generally speaking, tests are a "control check" to guarantee that your application does what it is intended to do. Tests give you confidence that everything is working as it should.
Running tests is also very helpful when we must refactor our code or upgrade a framework version.
To get started, you need to install Pest PHP with the Laravel and the Livewire Plugin.
Run each of the 4 commands below:
composer require pestphp/pest --dev --with-all-dependencies

composer require pestphp/pest-plugin-laravel --dev

php artisan pest:install

composer require pestphp/pest-plugin-livewire --dev
At this point, you are ready to create your test.
Run the command below:
php artisan make:test ProductTableTest --pest
You should now have a new file named: tests/Feature/ProductTableTest.php.
Open the file and replace its content with:
<?php
use App\Models\Product;
use function Pest\Livewire\livewire;

test('Database has products', function () {
    $products = Product::all();

    expect($products->count())->toBeGreaterThan(0);
});

test('Product table renders successfully', function () {
    $this->get('/')
        ->assertOK()
        ->assertSeeLivewire('product-table');
});
The first test is verifying that the database has products.
The second test verifies (assert) that your home page can be rendered without errors (assertOK) and that it contains the Livewire components product-table.
Now, you can run your tests with the command and verify if both tests will ✅ Pass:
php artisan test

Serve your project
First run the the command bellow for compiling new assets
npm run dev
We are ready to run our application
php artisan serve
Now you can open the URL bellow on your browser ``` localhost:8000

Summary
Congratulations 🎉 ! You have create quick datatable using Laravel 8. You did it without having to write a single line of code and that is with the help of PowerGrid Datatable.
The tutorial can be found here on Github

